Author Archives: polina

WEBSM-photogenic-sketch

Anyone Can Be Photogenic!

Anyone Can Be Photogenic!
8 Easy Steps to Looking Great in Photos

By Polina Roytman

WEBBG-photogenic-photo

Anyone can be photogenic. Yes, really! It just takes a little practice and know how. Most of us refuse to admit it, but let’s be honest we all want our photos to come out good, in fact better than good would be that icing on the cake.

1. The Angles and The Eyes:
A slight turn or a ¾ view is the most flattering pose for most people. First thing to understand is that a person is 3 dimensional, where as in a photo you are 2 dimensional. Meaning you get flattened and widened, losing depth. Depth perception is typically what makes a person attractive. A ¾ view, versus a straight-forward shot, tricks the eye into seeing more depth. Just remember to still look at the camera even when slightly turned. Doing this makes sure you’re always keeping eye contact with whoever is looking at the photo. Look at the camera as though you’re looking into someone’s eyes. Try not to think of it as a camera, see through it the way you would if it were a person.

WEBBG-photogenic-sketch

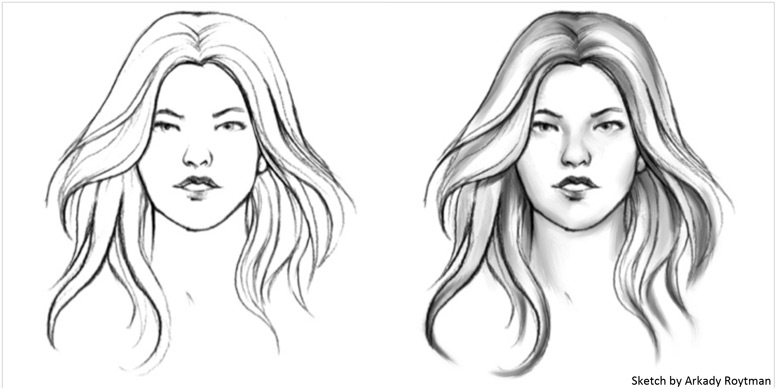
This sketch demonstrates depth perception. The sketch on the left is a simple black and white line drawing. There is no shading. It looks flat and wide. The sketch on the right is shaded in, giving more depth and looking more realistic and attractive. A photograph is the same principle.

2. I Feel Good About My Neck:
Extend your neck slightly forward toward the camera. It helps to hide a double chin, evens out wrinkles and adds some facial definition. Try to avoid tilting your head down as this can sometimes make it seem like you have a double chin.

Whenever possible try having the camera a tad above you, so you are looking slightly up. This keeps your head at a comfortable slight turn and your eyes open wide in a natural way. It’s also a great angle to hide a double chin.

3. When Not to Look at the Camera:
If you’re in a situation where the camera is at a lower level then try and look directly forward. If you look at the camera your eyes will appear to be closed or mostly closed.

4. Posture Posture Posture:
Standing, or sitting, up straight elongates your entire body. This works wonders. It flattens your stomach, smoothes out cellulite, perks up the bust, and naturally lets your neck elongate as well, which makes you look taller and slimmer, as well as adding definition to your face. Think of it like putty. The flatter it is the more slouchy and round it looks. The more you stretch it out, the thinner and longer it gets. Your body works the same way.

If the photo is being taken from more of a side angle, holding your arms just a tiny bit (a few centimeters at most) away from your body will make them look slimmer. Having your arms too close to the body could give the appearance of flabby arms.

5. Breathe and Forget About the Cheese:
Don’t hold your breath and suck it all in thinking it will make you look slimmer. Instead this makes you look uncomfortable and stiff. Saying “cheeeeeeese” and holding it until the snap has the same effect. You’re basically holding your breath, along with an unnatural smile, and it shows. Instead try to imagine something funny and genuinely smile or laugh, even make a laughing sound if you must, a few seconds before the photographer clicks.

Try thinking of your lover and a fun time you had together. Anything that makes you smile and even blush a bit does wonders for a good photo. A mischievous thought will put that happy grin on your face, and the camera loves it. A slight smile and a sexy glance with your eyes, truly smiling with your eyes, will do wonders for a great photo.

6. Group Photos:
If taking photos with a group of people try to keep your posture straight. Often times, be it standing or sitting, we lean in to try and get closer to the person next to us, which tends to show up as hunched over or poor posture in a photo. Try to take a step to stand closer to the other person versus leaning your body in. If you’re sitting try moving your chair closer to the other person’s chair. Remember try to slightly angle yourself even while sitting.

7. Shine On… Just Not In A Photo:
Try to keep down the shine in your t-zone [forehead and nose]. You can use powder or blotting papers, or even lightly pat with a paper towel if you have no other options. If that ends up being the case make sure no paper towel debris is left on your face.

8. Clothes Speak Volumes:
What you wear matters. Figuring out which color suits your complexion best would be the way to go. A quick basic guide is to look at the veins on your arm in good natural light. If they appear bluish you are a cool skin tone. If the veins appear greenish you are a warm skin tone. Cool skin tones tend to look best in jewel tones such as royal blues, rich emerald greens, pinks, purples, and magentas. Warm skin tones tend to look best in yellows, oranges, browns, and earthy greens.

Busy patterns and stripes tend to overwhelm most people in photographs. Red, black, and white can be tricky as well depending on the type of lighting and background, as well as the type of camera being used. When in doubt stick to solid and neutral tones.

Some of these steps may feel silly at first, but the more you do it the more second nature it will become for you, and the better your photos will get. A lot of times people avoid these steps for fear that others will think it looks ridiculous. Know that in the moment your photo is taken no one is paying attention to you and what you look like or how you’re posing. They are too busy and concerned with how they themselves look and are posing. Ultimately, the picture says it all, and I’ve never known anyone to complain when looking good in a photo. Practice these steps at home in front of the mirror or by taking photos of yourself, or having a friend take photos of you. Doing this will help you figure out what your best side and angles are. The more you practice the more it will become second nature. It’s worth the time and effort and will make you feel more confident and comfortable when it comes time for your ‘real’ close-up. It’s a domino effect. Once you’ve nailed down how to get one good photo, the rest of the photos follow suit!

Photograph by Kyria Lydia Abrahams
Sketches by Arkady Roytman

#YesPlease
@PolinaRoytman
Sign up to our email list.

Originally posted on June 18, 2013

WEBSM-Natural-Glow

Natural Glow

Natural Glow

By Polina Roytman

Constantly on the search for chemical and harsh free makeup, I decided to do a bit of an experiment using beet root powder as a blush.

_Natural-Glow

I was at the Dual Specialty Store in the East Village looking for some spices to add to my collection, when I noticed the beet root powder hanging on the wall. I thought it has such a pretty pink color that would make a beautiful blush! So I bought it and tried it out. For the last two months I’ve been using it as my blush and have been getting so many compliments. The color looks intense in the container, but goes on somewhat sheer and looks natural. If you prefer more intensity all you have to do is layer it on with a second or third dusting.

_Natural-Glow-beet-powder

After doing some research I also learned that you can make your own by baking beet slices and crushing it down to a fine powder. But with a $3.95 price tag for 1.6oz, I’ll stick to buying it at the store and enjoying the work-free glow that comes with it. Similar here, 4oz size.

Transfer some of the powder to a smaller seal-tight container to keep it from getting messy in your makeup bag. Use your regular blush brush and you’re all set!

_Natural-Glow-Lilac-Rouge-Crimson

An added tip: When I want a more dewy look, I dab a bit of the Lilac Rouge {mentioned here} with my finger tips at the apples of my cheeks after a light dusting of the beet powder and I’m good to go!

#NaturalGlow
#HomemadeBeauty
@PolinaRoytman
Sign up to our email list.

WEBSM-immigration-visa

From Russia To America

From Russia To America

By Polina Roytman

Immigration-photo{A photo of us taken by the local newspaper shortly after we arrived to America}

Today marks 24 years since my family and I came to America. Each year this day comes around and I am always in awe that I am here. I first came to this country and met other immigrants that were here for 20 years, 30 years, and thought “Wow, they are true Americans.” Yet I could never imagine myself being that way, it felt so far away and unattainable at the time. And now, each year I think “Wow, that’s me,” and it still feels surreal.

When I was in high school I had written a short essay about our journey from Russia to America. Later in college I expanded on it a bit, basically just adding an aside, for an English Composition class, but have since kept it quite private and have only shared it with a handful of close friends. Somehow when I was in school sharing it with strangers seemed safe, and showing it to friends made me feel too vulnerable. I think now, after 24 years in this country and nearly 25 years after leaving the Soviet Union, I am ready to share it.

While recently re-reading it I cringed. I sound so young and so certain. I almost wanted to change it as I don’t want people getting the wrong impression from it, or thinking I am full of myself somehow. But I decided to keep it as is. It is my writing from when I was 17 and 18 years old. The sentiment comes through, I hope, and keeping it intact feels appropriate.

Thank you to our most incredible family in Israel and our volunteers that helped get us here. Thank you, America, for taking us in and letting us feel at home and at peace. Happy 24 years and counting.

FROM RUSSIA TO AMERICA:
I guess it would be taking the easy way out to write four pages of commas and “or’s.” It would be so simple to write one long run-on sentence about my experiences when coming from Russia to America. Who wants to do things the hard way, right?

Like the time I was called kike, or when my brother and I were chased by bullies with guns they claimed were real, or when my parents had to run around to get paper work ready in order to be able to leave Russia; or when we had to keep an ax by the front door so my brother, at age eight, could use it in case someone other than my parents tried to get in; or when my father had to leave his parents and sister, thinking he would never see them again; or when we only got an hour’s notice to get our belongings on a bus that was to take us to the border where, once crossed, we would no longer be considered Soviet Union citizens; or the time my father had a knife put to his back, or when my parents had to scrub toilets to earn a few milliliers so we could buy food, or when we had to wait twelve hours for a train and couldn’t even go to the bathroom because it cost money; or the time my mom got kicked in the back so hard she fell to the ground and could barely move; or when we were told we had three minutes to get our luggage off the train before it had to leave, and my father and grandfather were throwing our suitcases out of the train window, while my mother, uncle, and grandmother were trying to catch them, and my brother and I were trying to help by dragging the luggage to the sidewalk; and when, after all that, the train stood at the station for an hour and a half before leaving; or when we had to look through the garbage for toys and furniture, or when we had to sell anything and everything we brought from Russia for nothing at the Italian black market to get money for food, or when we had to live in a basement and the woods for weeks, or when we had to live in a garage for months, or when we had to eat nothing but peanuts because it was all we could afford, or…

Yes, it would be so easy to just keep writing a never-ending, poorly punctuated list. Yet I never was one for taking the easy way out. So, here goes:

It is September 12, 1989, 2:15 pm. The bus is waiting outside my apartment building to take me from the only place, the only home, I have ever known. I walk outside but can’t move towards the bus. I must have one last look at the place I called dom (home in Russian) for seven years. I walk upstairs to the fifth floor only to find strangers carrying furniture out of my home. I distinctly remember three men carrying out the refrigerator while water was leaking through the freezer door. I never really understood why that memory is so vividly engraved in my mind. I guess because it was at that moment I realized my life would never be the same, not knowing whether that’s good or bad!

A few days passed and I was now in Vienna, sleeping on the floor in the basement of an old, worn down building. For three weeks my family and I shared one stove and one bathroom, with no shower, with thirty other families. Next stop: Italy. We arrived late at night and stayed in a filthy cabin in the woods for seven days, cooking whatever we could find on a fire started by a lighter and some branches. Not an easy task! The cabin seemed like heaven compared to where we were headed next. For five months we lived in a garage. Just my mother, father, brother, grandmother, grandfather, uncle, the cockroaches, and me.

During this five-month period a lot happened. There were life-threatening encounters with gangs and the mafia. A garage is usually not located in the best neighborhood! I had to put up with walking through dangerous, drug infested, filthy streets, sometimes alone, in order to go to school and learn English. I mastered the ABCs in one day and was proud of it! But as time passed, each day seemed to get longer. I began to doubt I would ever get to the land of Freedom and Opportunity. Finally, on March 15, 1990, my family and I were told we would be departing for America in seven days. I have never seen my family happier than they were on that day!

On March 22, 1990 when we finally stepped foot on American soil, I thought about all the obstacles I had overcome to get to where I was at that perfect moment. Thinking back on it now, I am not ashamed of the fact that I shared a garage with cockroaches, or searched the Italian dumps for a broken, used toy. “What doesn’t kill you makes you stronger.” It motivates you to work harder and do better. It disciplines you like and army Sergeant disciplines his soldiers. For my life did seem like a battlefield at times.

So, in conclusion (such a common transition, yet it fits nicely here), I survived the battle and became a soldier. I fought against the toughest Obstacle Army and won. There are enormous amounts of details I did not include, for some of them are too hard to look back on. The whole life story would make a best-selling book and a top-rated, three-part T.V. movie. But I will be modest. I don’t need the book or the movie. I have FREEDOM, and for that it has all been worth it!

An Aside:
I truly believe I earned my freedom. No one will ever take it away from me. I won’t let them. It is as precious to me as my family, my memories, my life, for without freedom I wouldn’t have one. I’m glad I went through this. I wouldn’t change one thing about it, because this one thing can change me as a person. These events taught me values; it never lets me forget what my parents sacrificed for my happiness. Never will I take them for granted. I strive to succeed not just for me but for them as well. As hard as it gets, this keeps me going. Everything happens for a reason. This always reminds me of how lucky I am.

Immigration-visa{March 30, 1989. A photo of my father and I on our immigration visa}

#FromRussiaToAmerica
#HappyAnniversary
@PolinaRoytman
Sign up to our email list.

WEBSM-Abha's-lotion-bar-03.2

Lotion Cupcakes

Lotion Cupcakes

By Polina Roytman

WEBBG-Abha's-lotion-bar-05.2

My beautiful friend of nearly 14 years, Abha, recently sent me a homemade lotion bar that I have loved using; both for how wonderfully it works and for the fact that it puts a smile on face every time I look at it and think of the caring and wonderful friend that made this for me and sent it all the way from England to New York. The fact that it looks like a mini cupcake doesn’t hurt either. The recipe is below.

Ingredients:
One portion cocoa butter
One portion coconut oil
One portion beeswax
Essential oils of your choice [Abha used bergamot, sweet orange, and sandalwood]

Instructions:
1. Place the cocoa butter, coconut oil, and beeswax in a double boiler. Abha used 1/4 cup of each and placed them in a Pyrex bowl on top of a saucepan full of boiling water on the stove. The bottom of the bowl should not touch the water. Allow all of the ingredients to melt.

2. Once melted, take off the heat and add the essential oils. Then carefully pour the well mixed liquid into the molds. Abha used silicone molds / cupcake holders such as 3. Once the bars are firm carefully pop them out and enjoy!

WEBBG-Abha's-lotion-bar-03.1

What are some of your favorite homemade beauty products?

#LotionCupcakes
#HomemadeBeauty
@PolinaRoytman
Sign up to our email list.

WEBSM-Office-pant

The Perfect Office Pant

The Perfect Office Pant

By Polina Roytman

Perfect-Work-Pant{Ann Taylor Trousers – Aryn K Blouse – Banana Republic Pumps, Rings, and Studs}

I recently received a question regarding office pants. My boyfriend has his own show called The Brother Love Owwwr under the Keith and The Girl network that he records in his studio in Nashville, and from time to time he has me on as a guest. I received a question from one of his listeners:

“Hello Polina!
I am a big fan of Brother Love and LOVE it when you guest star on the show.
Question for you: Work pants. I work full time at an office, and need to wear work pants, but hanging, folding, washing and drying are so complicated, and it seems whatever I do it’s wrong! Help me choose and care for my pants, please!” –Abby

Some basic things: If the office pants you own are wool or a wool blend I recommend following the care instructions that will tell you to dry clean only. I’m not a big fan of polyester when it comes to tops or anything worn at the top of the body because I like for the fabric to be as breathable as possible. But when it comes to bottoms, a poly blend tends to work well for certain things as it is highly durable, wears well, and easy to care for. I do prefer a poly blend vs 100% polyester. If the pant is washable, the care instructions will usually tell you the best way to wash that particular pant. However, if in doubt, I always recommend cold water, gentle cycle, and hanging or laying flat to dry. Try to avoid the dryer as much as you can. The less harsh you are on your clothing the longer it will last.

Another option will sound quite odd, but it works well, particularly for denim that you want to keep from fading. I recently learned this trick from celebrity stylist, Ty-Ron Mayes, and have been recommending it to people with great results. You spot treat the pants wherever necessary, then roll them up and put them in a plastic bag, sealing the bag as tightly as you can. Put that in the freezer, yes, the freezer, and leave it there for about 24 hours. The cold kills the bacteria and odors. The way dry cleaning uses high heat without water to clean your clothes, putting them in the freezer uses incredibly low temperatures without water to clean your clothes.

Below is a list of ten stores / brands, in no particular order, that carry a great selection of work pants in both wool blends and poly blends, for reasonable prices and various body types such as curvy, skinny, petite, and tall.
1. Ann Taylor [if you have casual Fridays, this denim trouser is a must]
2. Loft [carries a large selection of machine washable office pants]
3. Ellie Tahari
4. Banana Republic
5. Express [carries a large selection of machine washable office pants]
6. Gap
7. Bluefly
8. Jones New York
9. J.Crew
10. Zara

As far as hanging your pants. These four hangers are my favorite for keeping the pants neat and wrinkle free:
1. Five-tier swing arm slack rack.
2. Clamp pant hanger. This type of hanger I like only if it is felt-lined, such as this one from Ikea. The lining prevents the pants from getting damaged as well as keeping them from slipping off the hanger.    
3. Foam coated chrome non-slip. Comes in a pack of three.
4. Velvet four-bar slim line. Comes in a pack of three.

If you prefer to keep them folded, I recommend the rolling method that I demonstrate in this video [about 15 seconds in and then 40 seconds in] which will help to keep your pants from wrinkling while saving some space in your drawers. This same video shows how to keep your denim dark, which mirrors what I mentioned above on how to clean your pants.

What is your perfect go to item for work?

#OfficeStyle
@PolinaRoytman
Sign up to our email list.

WEBSM-Say-Something

Lashes for Days

Lashes for Days

By Polina Roytman

PureMascara

I recently received a question on my Facebook page asking if I have a favorite mascara.

“I just want some basic long black lashes for my everyday look that can make my light short lashes be seen behind my glasses and make my eyes pop. Any ideas?”  

And do I ever! My go to for the last year or so is the 100% Pure fruit pigmented mascara. It is 100% natural, vegetarian, and colored with black tea and berry pigments. It actually smells like fresh berries, which puts me in the best mood and wakes me up every morning as soon as I apply it. It lengthens, separates, and thickens lashes, all while being water and smudge resistant [note: it is not waterproof] and gentle on sensitive eyes and contact lens wearers.

It comes in four colors: Black Tea, Blueberry, Dark Chocolate, and Blackberry, my personal favorite. I’ve already managed to get several friends and my mother hooked on it. Until recently I only used their smaller travel size which retailed for $9. I loved the price tag and the fact that it was conveniently small enough to not take up too much space in my makeup bag. The small size was discontinued about a month ago leaving only the full size available, which retails for $18 to $21 depending on where you buy it. I’ve been using the full size for the past month and must admit I love it even more! The brush is bigger and does a lot more for my lashes than the smaller version, so it’s worth the price.

Amazon tends to carry it for the $18 price tag.

What is your favorite mascara?

#LashesForDays
@PolinaRoytman
Sign up to our email list.


WEBSM-LinkLove

#LinkLove

#LinkLove

By Polina Roytman

WEBBG-LinkLove

1. 100 years of East London fashion in 100 seconds.

2. 10 people that prove Russia is home to the best street style ever.

3. Guns N’ Roses “Sweet Child O’ Mine” retooled as 1920s New Orleans jazz.

4. Meet the original hipsters – Inside Brooklyn homes in 1978.

5. Five shampoo mistakes you had no idea you were making.

6. A four-year-old being moved by music for the first time.

#LinkLove
@PolinaRoytman
Sign up to our email list.